The first days of November mark Mexico’s Day of the Dead (Día de los Muertos), a lively and rich tradition in which departed loved ones are honored and the cycle of life is celebrated.
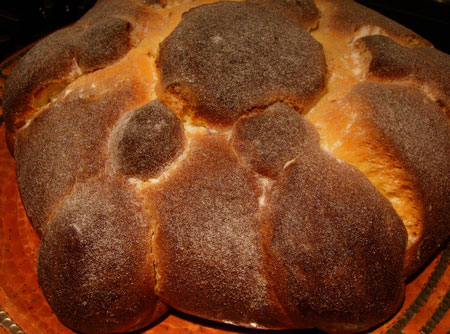
Although I have never had the opportunity to visit Mexico during this festive time, I wanted to try my hand at making Pan de Muerto (Bread of the Dead), which is traditionally sculpted in a representation of bones. I adapted this one from a recipe in Diana Kennedy’s My Mexican Kitchen: Techniques and Ingredients, as posted on Epicurious. My changes reflect what I discovered worked best for me in making the recipe twice.
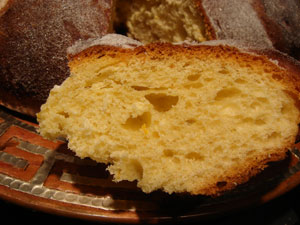
The bread is sweet and eggy, similar in texture to a yeasted coffee cake. This one has no anise seed, although other recipes I have seen include it. I didn’t use orange blossom water, only orange zest, and the result was a subtly citrus-scented loaf.
For information and beautiful photos of Día de los Muertos, check out this lovely and educational site by journalist Mary J. Andrade.
Pan de Muerto
(adapted from this recipe)
Yield: One large loaf, about 2 pounds
Time:
- Mix and ferment sponge: 2 – 2.5 hours
- Mix final dough: 15 – 20 minutes
- First fermentation: 2 – 3 hours
- Shape: 10 minutes
- Proof: 1 – 2 hours
- Bake: 40 minutes
Sponge Ingredients:
- 227 g flour
- 74 g water
- 3.8 g (5/8 t.) salt
- 24 g sugar
- 5 g (1 5/8 t.) instant yeast
- one whole egg plus one yolk, lightly beaten
Final Dough Ingredients:
- 100 g unsalted butter, softened
- 227 g flour
- 4 egg yolks, lightly beaten with 1 tablespoon water
- 37 g water at room temperature
- 1/2 teaspoon orange flower water and/or grated rind of 1/2 orange
- 114 g sugar
Glaze Ingredients:
- 2 egg yolks, lightly beaten with 1 teaspoon of water
- about 3 T. clarified unsalted butter
- about 3 T. superfine or regular granulated sugar
Method:
- Combine the sponge ingredients in the bowl of a stand mixer and mix with the dough hook on low speed until the ingredients are incorporated and a smooth, soft, elastic dough is formed, about 5 minutes. Transfer the sponge to a lightly oiled container. Cover and ferment at room temperature until doubled in bulk, about 2 hours.
- Cut the sponge into pieces and add it to the mixer bowl with all of the final dough ingredients except the sugar.
- Mix on low speed until the ingredients are fully incorporated, about 4 minutes. (At this point the dough is rather stiff, but will loosen up considerably with the addition of the sugar.)
- Turn the mixer to medium speed and continue mixing while very gradually adding the sugar. (About 6 additions, a minute or so apart.)
- Continue mixing in medium speed until the gluten reaches full development (a very thin, very translucent development can be coaxed from a handful of the dough). This may take about another 10 minutes, but will depend on your mixer.
- Transfer the dough to a lightly oiled container. Cover and ferment at room temperature until it reaches 1.5 times its original bulk. For me this took 2.5 hours.
- Press the dough lightly to degas it. Separate off about 1/4 of the dough.
- Form the large dough piece into a ball and press it into a disc about 8″ in diameter, and place it on a parchment-lined baking sheet.
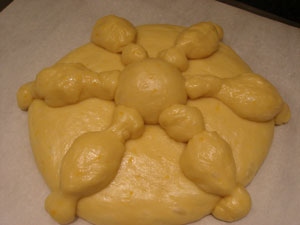
- Divide the remaining dough into 7 pieces. Shape one piece into a ball (to represent the skull) and the other six into “bones” with knobbed ends.
- Arrange the bones around the loaf with the skull in the center.
- Slip the baking sheet into a large plastic bag and proof the loaf until it springs back very slowly when pressed (with a lightly moistened finger, to avoid sticking). This took about 2 hours for me.
- Meanwhile, preheat the oven to 375F.
- Before baking, brush the loaf lightly with the egg yolk.
- Bake for about 25 minutes at 375F, then reduce the oven temperature to 325 and continue baking for another 10 minutes. Reduce the heat sooner if the loaf is getting too dark. The crust will be a deep, rich brown.
- Turn off the oven and leave the loaf inside, with the door cracked open, for another 5 minutes.
- While the loaf is still warm, brush it with melted clarified butter and sprinkle with superfine or regular granulated sugar. Brush off the excess sugar to leave the loaf with a fine coating.
- Cool completely on a wire rack.
Hello,
I made 2 breads last year
http://peho.typepad.com/chili_und_ciabatta/2006/10/pan_de_muertos_.html
we liked it very much!
Excellent! How I love all of your breads!!!
I just made your grissini last week or so and will be blogging about it this weekend (if time permits). Will link back to your post for sure! 🙂
What a fun bread! I’m horrible at shaping breads, but you’ve done an excellent job!
I’ve always wondered about this bread! I’d always call it dead bread. Thank you for posting the recipe! It won’t be in tiem to celebrate Día de los Muertos, but I think I’ll try it soon. Yours looks great!
What a wonderful fun loaf Susan! Great photos of the window pane.
Petra, great looking bread you made, with indentations for the eyes, which I forgot to do!
Anh, I’m looking forward to reading about your grissini. Your photos are always so beautiful.
Deborah, the shaping is my favorite part. I need to figure out how to keep the bottom knobs (epiphyses, for the anatomists) from getting obscured as the bread bakes.
Tanna, it was fun to make. And I loved learning a little more about this holiday where the connection between life and death, sadness and joy, is celebrated with gusto.
I just discovered your blog and I am in awe of your bread baking!
This looks like so much fun to make. It’s funny that living in San Diego all these years, and working with immigrants, I’ve never seen the shape before. Your’s turned out beautifully! I love the idea of the orange flower water.
Hi Barbara, thanks, and glad you stopped by!
Kellypea, I have seen the bread shaped in different ways, sometimes like a skull or corpse. I’m not sure if each shape is typical of a specific region.
I Have Diana Kennedy’s book and i was planning to make this bread for a while (I’m from Mexico and it reminds me of my childhood). I use your adaptation in my trial run and I love it. My only issue is that the bread got really really dark. For “El Dia de Muertos” I am thinking either to make 2 or 3 small loaves or to cover it with aluminum foil half way through the baking process. What do you think?
you should state what the food is used for, if there is one for that recipe. like for pan de muerto, you should state why it is used on a mexican el dia de los muertos alter, and what does it represent, or mean to the people who use it. that would make your site so much better.
Yes, I agree. I love pan de muerto. I would love to eat this up nice and slow. I am very impressed and jealous of your pan making skills.
thanks this has helped me alot
It’s great to see all this useful information on dog training.
I have a question though. How do you train a
younger dog?