My New Favorite Sourdough
I love baking all kinds of bread, but a basic sourdough loaf is an essential staple at our house. Good with everything from blue cheese to blueberry jam, and quite possibly even better unadorned, we always feel something is missing if there isn’t a loaf resting on the cutting board, ready for a quick snack or a hearty sandwich.
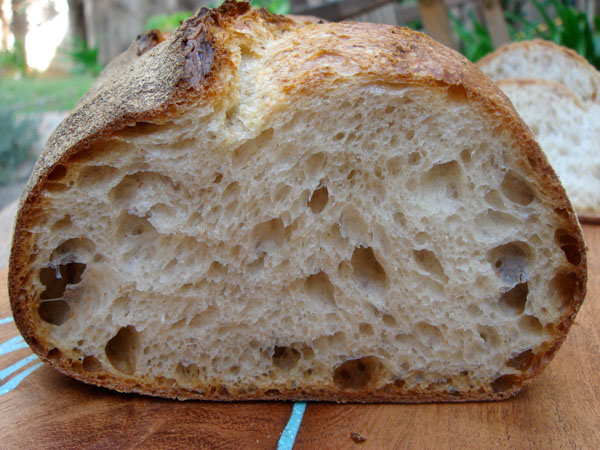
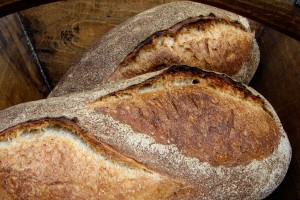
I first tried this recipe, adapted from the Vermont Sourdough in Jeffrey Hamelman’s Bread: A Baker’s Book of Techniques and Recipes, about a month ago. I loved it then, and have made it several more times since, to make sure the first time wasn’t just beginner’s luck. Nope; this one is a real winner. It’s a plain, honest, not-too-sour sourdough with a touch of pumpernickel for depth of flavor. With a thin, crisp crust and soft but substantial crumb, this is now my go-to bread for everyday good eating, anytime, with anything.
The original recipe calls for 125% hydration starter. I adjusted it to work with mine at 100%, and made a few other tweaks as well. I am calling it Norwich Sourdough, in honor of the home town of Hamelman’s King Arthur Flour bakery. And this charming Vermont town, as it happens, was my home, too, for five memorable years.
Norwich Sourdough
(adapted from Vermont Sourdough in Bread: A Baker’s Book of Techniques and Recipes by Jeffrey Hamelman)
Yield: 2 kg (four or five small, or two large, loaves)
Time:
- Mix/autolyse: 35 minutes
First fermentation: 2.5 hours
Divide, bench rest, and shape: 20 minutes
Proof: 2.5 hours (or 1.5 hours, then retard for 2 – 16 hours)
Bake: 35 minutes
Desired dough temperature: 76F
Ingredients:
- 900 g white flour (I used Heartland Mills unbleached malted all-purpose)
120 g whole rye flour (I used KAF pumpernickel)
600 g water at about 74F
360 g mature 100% hydration sourdough starter
23 g salt
Method:
- In the bowl of a stand mixer, mix the flours, water, and starter on low speed until just combined, about one minute.
- Let the dough rest (autolyse) for 30 minutes.
- Add the salt and continue mixing on low or medium speed until the dough reaches a medium level of gluten development. This should only take about 3 or 4 minutes.
- Transfer the dough to an oiled container (preferably a low, wide one so the dough can be folded without removing it from the container).
- Ferment at room temperature (72F – 76F) for 2.5 hours, with folds at 50 and 100 minutes.
- Turn the dough out onto a lightly floured counter. Divide it into 400g – 500g pieces. I usually make four 400g loaves and refrigerate the rest to use for pizza dough later. Preshape the dough pieces into light balls.
- Sprinkle the balls lightly with flour, cover loosely with plastic, and let rest for 15 minutes.
- Shape into batards and place seam-side-up in a floured couche or linen-lined bannetons.
- Slip the couche or bannetons into a large plastic bag or cover with plastic wrap and proof at room temperature for 2 – 2.5 hours. Alternatively, the loaves can be proofed for about 1.5 hours at room temperature, then refrigerated for 2 – 16 hours and baked directly out of the refrigerator; this will yield a tangier bread with a lovely, blistered crust.
- Meanwhile, preheat the oven, with baking stone, to 475F. You will also need steam during the initial phase of baking, so prepare for this now.
- Turn the proofed loaves onto a semolina-sprinkled peel or parchment. Slash each one with two overlapping cuts that are almost parallel to the long axis of the batard.
- Once the loaves are in the oven, turn the heat down to 450F. For 400g loaves, bake for 12 minutes with steam, and another 15 – 18 minutes without steam. I leave the oven door cracked open a bit for the last 5 minutes of this time. The crust should be a deep brown. Then turn off the oven and leave the loaves in for 5 minutes longer, with the door ajar, to help them dry. Larger loaves will need to be baked longer.
- Cool on a wire rack. Don’t cut until the loaves are completely cool, if you can manage it!


Oooh, that looks delicious!
Did you capture your own yeast for your sourdough starter?
-Elizabeth
Thanks Elizabeth! Yes, I did raise my own starter for this. I’m going to be posting about that soon.
I’m really looking forward to reading about your starter, Susan.
I’m on day 5 (again) of capturing my own yeast. I’m getting nervous that it’s not going to work but absolutely determined that it will….
-Elizabeth
Susan, I love this bread! I don’t have a mixer so did it by hand and as I said on TFL I made a real mess when I kneaded in kosher salt! Took some extra kneading and stretching but once I had fixed it the dough was a delight. I had also whined pitifully on TFL because I couldn’t get crisp crusts, but with these loaves the crust was crunchy – and I got EARS! Many thanks, Annie
Hi Susan! I love your site and you already know I’m a big fan of your baking!!!
BZ
Elizabeth: you’ve gotten your starter off the ground by now. Looking forward to seeing more of your bread.
Annie: ears, crisp crust — all good. Keep baking!
BZ: thanks! You’re no baking slouch yourself.
I love this site. I made the melon pan, it was cool!
Is it possible to put the bakers percentages on the recipes? If not, I will still love the site.
Gena
Hi Gena Lora, I’m so happy you like my blog. The melon pan is fun, isn’t it?
It has been my plan to include baker’s percentages with the recipes; however, I thought it might be confusing to do that without providing an into to baker’s math for those who aren’t familiar with it, and I haven’t gotten that done yet. I’m working on it though; look for it soon!
made this for my co-op using SF bay area wild yeast starter — they loved it!
I made a few loaves of this great recipe! Let be say I had a breadulous experience. For the first time, I am so proud of my bread. With your help I have finally created something beautiful. I raised my own starter and here are the results:
http://picasaweb.google.com/daniel.divita/NorwichSourdough
Enjoy!
I can’t tell you enough, this blog is the best!!!!
L, I’m glad the bread turned out well. Lucky co-op!
Daniel, you have every reason to be proud, those loaves look fantastic. I’m so happy you let me know.
One question I have, is the dough supposed to be a bit sticky? The first time I made the dough it was really sticky so I added some more rye flour. It made it a bit more firm, but was still loose. Today, I made another batch and it came out just as sticky as the first. I added some more rye flour, but tried to keep it looser than my last batch. The first fermentation took off like wild fire. It will be interesting to see how these come out. Thanks again!
Daniel, “sticky” and “loose” are subjective but the dough is definitely on the somewhat sticky side immediately after mixing; it becomes less so as it ferments. If you would like your bread to have a more open crumb (interior), increase the water. For a less open crumb, decrease the water (and mix longer). I like to use water rather than flour to adjust the dough consistency so the ratio of flour to other ingredients is maintained.
This sounds absolutely delicious. It will accompany the coq au vin I make for my family on Christmas.
One question about the starter: does “ripe” mean at full rise in the daily cycle of the starter, or does it simply mean a starter that has matured and is capable of raising bread?
Mike, this will go great with coq au vin. Sounds like a wonderful dinner. By “ripe” I do mean at full rise (i.e., several hours after feeding). Merry Christmas!
Hi Susan,
Great blog you have! I already tried several of your recipes and they are all great.
Your sourdough bread and instructions to make a starter are great, it is the first time I managed to bake a good sourdough! I already made the bread succesfully several times. I baked it with steam and on a baking stone, and I tried baking it the KN method, and that worked great too.
One question though: your crumb seems very light and airy in the picture, mine is a tighter. Do you have an idea what might be the problem? I don’t use malted flour but bio all purpose flour, could that be it?
Thanks for your great website!
Lotte
Lotte, there are several things that go into achieving an open crumb. In general, the more water you use, the more open the crumb will be. The gluten needs to be developed sufficiently to support the large(r) air pockets, but if it’s developed too much the crumb will be very regular. Also, make sure you’re not overproofing the loaves or the crumb will be dense.
Hi Susan, I tried using more water (50 grams) and kneading longer. Since I don’t have a stand mixer I use a handmixer and I think that calls for longer kneading also.
They turned out beautiful, with a nice open crumb!
Thanks for your tips and help.
Lotte
Hi Susan, I made this bread several times before followed the recipe posted on The Fresh Loaf. But this time I followed your recipe and baked the bread in the new set up oven similar to yours using lava rocks & hot water to create steam… It’s much improved as you can see the results here:
http://www.flickr.com/photos/sierravalleygirl/2168855820/in/set-72157600905528460/
It’s a not-so-bad crumb for hand-mixed dough –I was the mixer– ;o) and slashed with a utility blade, isn’t it?
However, the crust wasn’t as thick and as crackly as that of bread I baked in a closed-lid pot (in my pot baking days). I used about 2 x 3/4 cup of hot water in 2 times during the steaming phase. Could it be then the prolonged steaming phase the cause? Thanks.
Lotte, you’re welcome, I’m happy my suggestions were helpful.
Mily, great looking loaves, as all of your are! Steam is only helpful to a certain point, and if there is too much/too long it can compromise the crust. I use less than a cup of water, once only, and remove the steam pan after about 8-12 minutes. I think it depends partly on your oven, how good it is at keeping the moisture in, so experiment. I’ve found that keeping the loaves in the oven with the heat off and the door ajar for several minutes at the end of the bake, to drive off remaining moisture, is very helpful to producing a crisp crust.
I’ve been experimenting with sourdough for a almost a year and have had some success interspersed with some failures. Here is a link to some photo’s http://picasaweb.google.com/qiuruzheng
Yesterday I tried your technique of using a flower pot and unglazed tiles in a gas oven. It worked great, had wonderful blisters on the crust. I’ll do this again.
The main issue I’m struggling with now is getting the bread to taste sour. I use a starter I got from Sourdo
International (SF Starter) and it has plenty of rise and the container in the fridge makes lots of hooch so I assume there must be ample yeast and bacteria. For a Sunday bake I feed the starter Weds night and after a couple of hours on the counter put it back in the fridge. Friday morning mix a half cup starter, a cup of flour and half cup water and let proof for 12 hours at room temp (~66 F). Friday night punch down and repeat for 8 hours, Sat morning repeat for 4 hours in th eoven with light on (~ 80 F). Next, mix in 3 cups flour, cup water with salt dissolved. Let stand for half hour before knead. Then let rest for hour and begin stretch and fold for several hours. Into bannetons and retard in the fridge over night. Sunday morning take out of fridge at same time as pre-heat oven and then bake.
The bread has good crust and crumb, but not much in the way of sour. When I took the starter out before using the volume had increased and there were small foam bubbles on the top. So, I’m assuming the starter was good to go. With such long fermentation times I expect extra sour. The end result is faint sour.
Sorry for the long post, thanks in advance for any suggestions to increase sour.
Herb, I’m having a little trouble following how you build up your starter, but in general sourness is favored by cooler temps and a stiffer starter. Your bread certainly looks great!
Here’s how I build up my starter: Feed the fridge jar a couple of days before using. Then take out 1/2 cup starter and mix with 1 cup flour and 1/2 cup water. Let ferment for 12 hours at ~66 F. Punch down and then mix with 1 cup flour and 1/2 cup water and let ferment for 8 hours at ~66 F. Punch down and mix in 1 cup flour and 1/2 cup water and ferment for 4 hours at ~80 F( would have tried 6 hours at 66 F but was running out of time). Then I mix in 3 cups flour and 1 cup water, salt and then autolyze, knead, proof and then retard.
I was thinking that the long cool ferments would enhance sour. I just shared these thoughts with Ed Wood who tells me that long cool ferments or proofs aid in yeast production and enhance rise at the expense of bacteria production while short warm 85-95 F ferments or proofs aids in bacteria production at the expense of yeast. So, this weekend I’ll try warmer and shorter proofs. I’ve also been using white flour exclusively and after experimenting with temps will try adding a bit of rye.
Herb, how interesting that Dr. Wood’s advice is exactly opposite of what I’ve been taught and experienced. I’ll be interested to hear whether your warm short proof gives you a less sour flavor.
Well, sorry to go on at such lengths with these posts. I can report that I did two experiments with proofing temps over the weekend. Both experiments produced the extra sour I was looking for.
With one I reactivated the starter at 80 F for 8 hours and then mixed up the dough, kneaded and proofed for 12 hours at 80 F. After 10 months of fooling around with sourdough I actually made
a bread which tasted sour. The only problem with this one was that I used too much water. The other experiment was with a three stage proof. I used 1/2 cup starter right from the fridge (a day after activation) added 1 cup flour and 1/2 cup water (85 F) and proofed at 85 F for 8 hours, punched down repeat two more times. Then mixed in 3 cups flour and 1 cup water, salt, autolyze, knead, rest, proof and bake. I usually use this 3 stage recipe with longer (12 hour) proofing at room temp (~66 F) and retard overnight before baking. The bread is almost sweet, no sour. Could only get to sour with the warmer proofs.
I’m puzzled with the results. I live near SF and would expect that historical use of sourdough was at similar temps as my room temp. I plan on more experimentation this coming weekend and will try to faithfully reproduce your recipe. Could you explain ‘ripe starter’? I’m guessing that it’s activated or recently fed.
Herb, glad you found a way to get the sour you were looking for! By ripe I mean I’ve fed it several hours prior and it’s at its peak volume. See my post on how I maintain my starter for more info.
Hey Susan (just thought I’d respond on this rather than back on my blog) – when I finally decided that I’d try this recipe, I converted my starter to a 100% hydration. I’d been feeding it 1:1 by mass for a few days by the time I made the bread. Would that have given it enough time? The second loaf (that I refrigerated) didn’t flatten out as much. I wasn’t able to get a shiny crust though, even with steam and spraying it with water every minute for the first 10 minutes. Should I spray it some in the end as well?
Caitlin, yes, 1:1 feeds for a few days should get it very close to 100% hydration. Your crust looks good to me; it doesn’t have that chalky look you get with insufficient steam. However, I wouldn’t spray so often — you lose too much heat with all that opening of the oven door. I’m not a fan of spraying, I think there are better ways to steam. I explain what I do in my post about steam — steam at the beginning and don’t open the oven again for about 10 min. You definitely want DRY at the end for a crisp crust, so do not spray at the end.
Thanks! It’s reassuring that I had sufficient steam with that one. I think I just have to improve my steam technique a little, which might involve oven modification. Hopefully then I’ll get better oven spring and it will actually open up at the slashes.
hi Susan such a nice bread !!!
u wrote that u converted this bread from ha 150 % hydration sourdough to a 100 %
im wanting to do that with one of my recepies to..
thanks for reply !!
Emilio, I think I will cover this in a future post. Stay tuned…
bahh : ) ill write u the recepie its a short one..
400g sourdough ratio 1:2:1
600g water
300g white flour
500g rye flour
20g salt
Will be forever thankfull
The Yum-A-Rama Bread Blog » Blog Archive » Growing Up: Moving from starter to bread on May 24 2008 at 10:32 pm:
[...] as a good example, let’s say you’re making the Wild Yeast Blog’s “Norwich Sourdough” and you’re making the full recipe (which gives four 500g loaves). The recipe requires [...]
The Yum-A-Rama Bread Blog » Blog Archive » Round Three: Oven goes hellish on May 25 2008 at 10:37 am:
[...] By the way, I made the bread and decided to assume the temp was somewhere in between the three different reading, so I turned [...]
Susan I just wanted to share: I baked my FIRST EVER sourdough, with my new starter and it came out beautifully: http://picasaweb.google.com/agsinclair/Sourdough
Your blog was so incredibly helpful. Thank you!
Angela, beautiful! Thanks for sharing.
Buns for my burgers « Beginning With Bread on June 25 2008 at 01:48 pm:
[...] following recipe is adapted from the Wild Yeast blog (http://www.wildyeastblog.com/2007/07/08/my-new-favorite-sourdough/), which adapted the recipe from the San Francisco Baking Institute [...]
A Simple Sourdough « Beginning With Bread on June 25 2008 at 01:51 pm:
[...] following recipe is adapted from the Norwich Sourdough found at Wild Yeast (http://www.wildyeastblog.com/2007/07/08/my-new-favorite-sourdough/), a beautiful online bread blog that continuously inspires [...]
the starches and the proteins are modified by the lactic acids, resulting in a moister crumb and better keeping qualities, what kind of acids modify the starch and protien and how does it make it make a moister crumd and longer shelf life. can it be explain through a diagram?
wild yeast can tolerate more acidity than commercial yeast. Why and how?
Herbert, I’m not a chemist or microbiologist so I don’t think I can give you answers at the level of technicality you’re looking for. Perhaps if you query at The Fresh Loaf someone can point you to some scientific references.
Sourdough Chronicles: How I Was Mooned By My Own Bread (or, fendu shaping gone awry) at Too Much Food on July 15 2008 at 09:55 pm:
[...] practicing with Susan’s (of the Wild Yeast blog, a fantastic resource for all bread bakers) Norwich Sourdough recipe, and ran across her tutorial on fendu shaping. I’ve been wanting to try different [...]
That is the most beautiful loaf of bread I have ever seen. I almost licked the screen. I am making a starter tonight, so I can make this next week. Wow.
Greetings from Holland!
I have been staring in delight at this loaf for weeks, no, months and today finally baked it!
I have been raising a starter the past two weeks and yesterday took the plunge! My first sourdough-attempt.
The rising was terrible (did grow for the least bit), the dough looked like anything but good bread so I just let it on the counter and only baked it this morning. It rose a bit but the oven did all the work and I was delighted to find two kinda pretty loafs coming out of the oven at the end. The bread was still quite wet inside (but I didn’t allow it to cool completely), the taste was quite good! Will try again, thanks for this recipe!!
I’ve been reading your blog for a while (found it through thefreshloaf.com), and wanted to thank you for the great recipes. This was some of the best sourdough I have ever made. Great work!
HI! I’m trying to figure out how to make and use sourdough starter and am confused…when a reciepe calls for “ripe” 100% hydration starter is the stuff that you discard at each feeding? and if it is can you keep it by itself for a period of time.
I made it twice already, each time the same successful… so thank you,
we are just arriving in your country, and I’m very happy to continue my baking here, with new ingredients, a new challenge. Your blog should help me in my cooking quest.
Jess, the starter is ripe, or mature, when it reaches its peak volume. This for me is about 8 (and up to 12) hours after I feed it (and I do feed every 12 hours or so). You should use it when it’s ready because if you keep it around too long without feeding it will run out of food and some of the yeast will start to die, and then it will not work as well to raise your bread.
I just made this bread, and it’s MY new favorite sourdough. I was too impatient to let it get sour, so I just did the 5 hour proof. I have not built up a large inventory of bread baking gear, so two loaves are in mini loaf pans in the fridge, and the other two I just made my best loaf on parchment, and allowed it to rise in a sheet pan. I then moved each to a hot pizza stone in the bottom of the oven, threw a few cubes of ice in the oven, and let er rip. The loaves are not tall enough for sandwiches, but it is delicious! This is excellent bread. My starter is also new, so I assume the flavors will further develop with patience in proofing, and as my starter matures.
Thanks again!
Do you have any experience with spelt sourdoughs?
I’ve converted a wheat starter over to a rye/whole spelt.
100 percent spelt just doesn’t seem to keep my slurry happy enough.
Any ideas or recipes….
So far I am creating very dense loaves…maybe to dense for my liking.
Hello there
first time on your blog – definitely NOT the last
I am still a beginner as far as baking bread goes, but have two starters going. ONe of them with wild yeast made as described by Dan Lepard’s in his fantastic book (The Handmade Loaf). The other is King Arthur’s commercial sourdough starter.
I feed my wild yeast like this:
55g starter + 100 g water + 125 g flour
I am a little unsure how to calculate the hydration and how to change it to 100%. Do I add 100g water + 100 g flour? How does the 55g of starter enter in this calculation?
Thanks so much for your help, forgive if this is a silly question
Nik, glad to hear your bread came out so well!
Char, I’m sorry, I have never raised a spelt starter, and I haven’t too much experience baking with it. Dense loaves may be because the gluten in spelt is not as strong as that in regular wheat.
Sally, to change to 100% hydration simply feed the starter with equal parts flour and water by weight (e.g., 100 g water and 100 g flour). The amount of starter you start with does not affect the hydration as long as it itself is is 100% hydration. (I.e., if I start with something that’s half flour and half water, and add equal parts of flour and water to it, it’s still composed of half flour and half water. But if you’re starting with something that’s less than 100% hydration, as your is now — 80% — it will take a few feedings of equal flour and water until it “settles out” to 100%.) The amount of starter you start with depends upon how much starter you want to maintain or build, how often you feed it, and how quickly it ferments. See my post on how I maintain my starter for more info.
Perfect! That answers my question!
I usually feed my starter 3 times before using, so I can adjust the hydration accordingly using your method
I’m keeping a bread journal because it is quite amazing how a small change in proportion of flours or rising time, affects the final loaf.
thanks for your quick reply!
Hi All,
I went to a local bakery today and obtained sourdough starter. I fed it per the instructions given to me by the head baker.
.16# starter, .60# flour, .75# water. My water is filtered and my flour is organic, 12% proteen. Water was heated to 82 degrees. I scaled this down by half and maintained the same ratio. I mixed it and am maintaining a temperature of between 78 and 82 degrees. It has been 8 hours and it is not bubbling or frothing. Have I killed it or should I wait longer????
Capo, sounds like you’re doing everything right so I doubt you’ve killed it. Has the volume increased at all? A healthy starter does not really froth as much as become light and airy with a pebbled surface. You might want to check with the baker who gave it to you.
Hi! Thank you for sharing your knowledge about bread. I never successfully baked with homemade starters. I would like to know what you mean by White Flour. Do you mean bread or all purpose flour? Thank you again for all your help. Your breads look wonderful!
Lu
Lu, here’s a post I wrote about selecting a flour for bread:
http://www.wildyeastblog.com/2008/06/23/flour-101/
I loved it so much I came back to do it again! Thanks times two.
thank you! I made the bread this weekend and it honestly was the very first time I’ve been pleased with my baking results. The loaves were excellent! the right taste, texture, look, everything!
I appreciate your sharing your talents with the rest of us.
Now to try to extra-sour version that you posted!
hi, i love your blog, can you please post the recipe of
ripe 100% hydration sourdough starter and 50% in details please, thank you for all this recipes
OK, I’ve been baking all my life, almost, but I’m not familiar with your % measurments. How do I change that into cups, t, and Ts? I really want to try your sourdough bread recipe.
Thanks,
Syb
also, would it be good to use bread flour?
Syb
Warda, my posts on starting and maintaining a sourdough starter are here:
http://www.wildyeastblog.com/2007/07/13/raising-a-starter/
http://www.wildyeastblog.com/2007/09/29/maintain-starter/
Sybil, if you don’t have a scale, you can get weight-to-volume conversions from the USDA Nutrient Database:

http://www.nal.usda.gov/fnic/foodcomp/search/index.html
Then order a scale.
You won’t find the weight of sourdough starter in the database. A cup of sourdough starter weighs about 230 grams, but that’s a very rough estimate and it depends on how you measure that cup. Really, a scale is better
Here is some information on how to choose a good flour for bread:
http://www.wildyeastblog.com/2008/06/23/flour-101/
You are amazing, certainly above the crowd and I can’t wait to subscribe. I have so much to learn. There is an “Italian” saying that when someone is called “a piece of bread” it means they are solid, good, to be trusted like salt of the earth. Your sight is certainly “un pezzo di pane.”
This is such a great recipe and my bread has turned out amazing. I’ve also been experimenting with the recipe and variations including whole wheat and stone cut oat meal. Amazing, I love it.
Hi Susan,
I love your blog. I’ve been reading it every night and the more I read, that more I want to learn and start baking. This is a great source of information and now I’m totally addicted to it. I just started baking recently,and since I love good bread, I decided to give it a try. I already made a few loaves of sourdough bread. The results were o.k, but I want to improve and try again. Yesterday I baked your Norwich Sourdough recipe, and the flavor turned out great, the crust was good too, but my crumb doesn’t have those big holes I was looking for. Any suggestions? Thanks for your help and all this beautiful work you have done!!
This bread is delicious, now it’s my favorite sourdough too. I’ve put mine in the fridge for a night after the 2nd fold, than shaped it and rised in the morning.
Hi, I’ve just baked it! It’s sooo delicious- has great crust and moist, aromatic interior. Thanks for sharing this recipe! I quoted it here: http://glimmercreations.blogspot.com/2009/04/norwich-sourdough-najnowszy-nr1.html
I just wanted to thank you for the easiest sourdough recipe I could find! I dove headfirst into the world of sourdough starter about a week ago with nothing but basic knowledge, and after getting so-so results with rye flour, I switched it to white whole wheat. I like that much better, as I can more easily judge when it’s “bubbly.” (The rye starter was very thick and didn’t show it’s “life” as well, which made me nervous, LOL.) I was afraid it wasn’t mature enough to leaven a bread by itself, but after seeing such an easy recipe with basic ingredients that I wouldn’t cry over if they ended up in the trash, I decided to give it a try. It turned out pretty good for a first go! My oven is funny, so my crust got a little crispy (any ideas on that one? I’m getting a stone soon to help, but any other ideas in the meantime are welcome) but the inside was so light and chewy, and so very, very tasty. http://picasaweb.google.com/BNLeuck/MyFirstEverSourdough (Excuse the poor quality…)
Me again! Just wanted to let you know, I altered your Norwich Sourdough recipe (a very tasty one as-is!) to exclude the 120g rye flour and include 120g rolled oats. I know rolled oats soak up a LOT of liquid, so to compensate, I pre-soaked them in a mixture of ~1/2cup very hot water plus a tablespoon of honey for about five minutes. I’m sure you can change the amount of the honey or leave it out all together if you choose, but I like the extra sweetness. I think it compliments the tang of sourdough very nicely. Also, I used 200g of white whole wheat and 700g bread flour. It comes out very soft and chewy, absolutely wonderful for sandwiches. I uploaded some pictures here ( http://picasaweb.google.com/BNLeuck/NorwichSourdoughWithOats ) for everyone to see.
Snabbt och lätt vetesurdeg med lite råg « Mat Geek - eftersom allt är gott on April 28 2009 at 01:46 pm:
[...] stillar behovet med något som jag och mina blodkärl senare får ångra. Så därför tog jag det här receptet och gjorde om det lite så det passade mig bättre. Ingredienser: 900 g vetemjöl special [...]
Hi Susan, just want to say a Big Thank-You to you for all the lovely pictures and recipes you made at wild yeast blog. I have been following your blog postings here as well as at The Fresh Loaf and thoroughly enjoying them. I’ve made a purchase of books through your website. As well, I have signed up for Artisan I and Artisan II in August at SFBI. Thank you very much for your recommendations!! I am going to fly all the way from down under in Australia to San Francisco and am really looking forward to it. My whole family share my enthusiasm. Here are two positings of mine in The Fresh Loaf that I would like you to look at:
(1) http://www.thefreshloaf.com/node/11758/my-first-sourdough-bread and
(2) http://www.thefreshloaf.com/node/11783/tom-cat039s-semolina-filone-glezer039s-quotartisan-breadsquot (please scroll down to the comments by me entitled “Australian Brero flour on David’s Semolina Filone”).
Once again, thank you so very much for what you have done.
Warm regards,
Shiao-Ping
Hi Susan,
Kudos on the phenomenal website. I am a daily “webonaut” of all things yeast and an avid kitchen explorer. Your recipes opened up a whole new chapter of flour coated revelry. My family thanks you!
A quick question on the folding for the Norwich Sourdough. When you place your mixed dough for the first fermentation, do you oil the top of the dough as well as the large rectangular container, then cover with plastic wrap or do you only oil the container and leave the top un-oiled but covered with plastic so it won’t dry out. The reason I ask is that I noticed that the dough sticks a bit to the plastic wrap but was concerned about putting oil on the dough, as it might then prevent it from coming together properly in the bake.
Good Risings,
Marat S.
Marat, I use a container with a lid. The container is large enough to so that the dough does not fill it and does not touch the lid. Then no plastic wrap is needed, and you do not need to oil the top of the dough.
T-Minus 20 minutes before I pop the 4 loaves in the oven. Thanks for the clarification Susan. I’ll pick up a large Tupperware container for my bulk fermentation and save some bucks on the plastic wrap.
Good Risings,
Marat
Susan, I just used this recipe to make some wild yeast multigrain sourdough, which is so awesome. It is exactly what I was wanting and hoping for in every sense. Nice and chewy with an open crumb, great tangy sour taste, and fantastic crisp crust. I am so glad I found your blog and love all the yeast spottings too. This will be my standard sourdough recipe from now on. Thanks so much!
Norwich Sourdough | Food Geekery on June 1 2009 at 06:22 am:
[...] you’d like the recipe, the bread I made is the Norwich Sourdough, except I substituted stone ground whole wheat flour for the rye flour. Very good [...]
Extra Virgin Olive Oil tips: From Bread to Popcorn on June 4 2009 at 12:03 am:
[...] advice on topping it with salt and our Arbosana EVOO. The bread recipe, by the way, is courtesy of Wild Yeast blog and we plan to send our photo to its YeastSpotting [...]
Dear Susan -
I’ve been enjoying your blog for several months now, (during the course of those several months, I’ve purchased a baking stone, a slasher, and made the fabulous cloche!) and I finally decided to write in because the successes I’ve been enjoying with my sourdough starter has been absolutely amazing and they wouldn’t have happened if I hadn’t encountered your extremely thorough help and guidance on your blog. So, thank you very much!!!
While I truly enjoy the preparing, baking, admiring, and tasting delicious sourdough loafs, I also enjoy making soft yeast bread. As I see your skills and knowledge allow you to create even your own melon pan recipe just by tasting, you probably do not need it, but here is an interesting Japanese bread recipe website that I like very much.
http://home-baking.net/english/blog/index.php
He is Japanese but he has translated most of his recipes and they are thorough with tons of pictures and full of interesting ideas, especially shaping.
I think it’s worth a visit!
Again, thank you and I will continue to call you my bread “sensei.”
This recipe gave fantastic results. Bravo! It is a keeper.
I used Manitoba Cream flour for the white flour.
Delicious!
The deal with Bud: he’s [still] alive! « Toxo Bread on June 16 2009 at 09:17 pm:
[...] Bud pulled through! (The mark is how much starter there was after I fed him, and before I let him rise.) Ladies and gentlemen, we have a sourdough starter! I fed Bud twice more with the mix of rye and white flour, and tonight switched him to white flour only, but with more “food” (1:2:2 ratio, so there’s twice as much water and flour per part of starter) to see if he can still double in 12 hours or less. If Bud is still bubbling away happily tomorrow morning, then I can try him out in my very first bread recipe that calls for levain, or starter. Maybe some Norwich Sourdough? [...]
Norwich Sourdough « Toxo Bread on June 21 2009 at 05:37 pm:
[...] From Wild Yeast’s Norwich Sourdough [...]
lactate on July 1 2009 at 07:39 am:
lactate…
Quite a few individuals see the use of weight loss diet patches as a move forward in the fight to control weight issues seen in the population, however the Federal Trade Commission in the United States has warned the public not to be misled by exaggera…
Hi Susan,
thanks for the wonderful blog! I have a couple of questions for you.
Is there any difference between folding the dohgh just before retarding in the fridge or folding after retarding?
What is the suggested temperature for retarding , say 20 hours? (Top of the fridge at 4° or bottom at about 10°).
Excuse me if i’m not so clear, but my knowledge of the English language is only based on web lurking and reading. Thanks.
very beautiful!!!!!!!!!
Susan, I must really trust you! I have a tendency to change recipes before I use them. Very little change to this one. Even if the bread hadn’t looked and tasted fantastic, the dough itself was a joy to work with.
I used a postal scale and conversion charts to arrive at this for 1 large loaf (1 3/4 lb. cooked):
3 1/4 cups bread flour (from Sam’s)
1/2 cup KAF pumpernickel
10 oz. water
6.4 oz. ( by weight) starter
1 1/2 teaspoon salt
I mixed it (well) by hand and followed the rest of the instructions, refrigerating it for about 14 hours. I let it sit a room temperature while I heated up my commercial gas oven to 475 – about 30 minutes.
Turned it down to 450 after putting the dough on the stone. Cooked it for 15 minutes with steam, 15 without steam, 10 more minutes with the oven turned off and the door cracked open. I think the oven temperature was a little over 450. Beautiful!!
I’d never had the nerve to throw the water on the oven floor, but I did, and the world did not come to an end!
My next one will be a smaller version using my Cuisinart 100 Brick Oven. Any recommendations?
Thanks so much.
Fantastic! My new favorite sourdough, too…. I’ve just made 6 loaves and I’m thrilled with the open structure, even though the dough is fairly manageable. Retarded overnight, and brought to room temp before baking. Next time I’ll try baking from the fridge, as you suggest.
The world did come to an end the next time I threw the water in – seems my aim is not too good. The water put out the pilot light! I’ve given my throwing arm a little practice, so maybe it won’t happen again.
Pitkään kohotettua mantelileipää « Anteeksi, että vaivaan on October 24 2009 at 03:06 am:
[...] mantelisen hapanleivän lähtökohtana käytin iki-ihanaa Norwich Sourdough [...]
I am a newcomer to bread making, but I must say that this recipe came out great. I have been coaxing along a sourdough starter for a couple of weeks and decided to try it out on this recipe. I must say I was pleasantly surprised, as another seemingly great sounding sourdough, was far too dense. I followed the recipe to the letter using the folding and proofing times given (my house was 72 degrees all day). The times were actually spot on for what looked to me like an appropriate final rise. As for cooking, I used a 475 degree gas oven with my pizza stone and a cast iron frying pan that I poured boiling water into when I put in the loaf. I removed the water after 12 minutes and cooked for 18min more.
I was patient with the finished product and it paid off. The bread was still just barely warm and it was the perfect conveyor for my potato and root veggie chowder. The crumb was tight yet airy and the crust, just that, crusty. In the future, I may relinquish my spoon in order to eat a whole bowl of soup with this bread.
All in all, I have always been an enthusiastic cook, but this and Jason Molina’s ciabatta have made baking exciting. I am always exploring new foods and techniques, but I also enjoy having go-to recipes so my friends and family don’t always have to be guinea pigs. I love your site and I look forward to exploring other breads on it.
Thank You. I have Made the Norwich bread several time now and I have HOLES!!! and it is yummy and I feel I am finally getting closer to my goal of crispy crust and chewy bread. I live rural and to get good bread I pretty much have to make it myself…Yea!!!
Plus I love the name because I went to a summer camp called Camp Norwich in Massachuesettes for many years. I love your site and thank you so much for sharing and inspiring!!!
liz Tree
IS the salt necessary?
A few of my family members are on salt restricted diets. I have always made bread without the salt and have had no problem with it, but I know that the salt retards the growth process of the yeast so that it doesn’t rise too quickly.
Has anyone tried this recipe without the salt?
After my first attempt at making sourdough I am pretty happy! thank you for a great recipe!!
It took overnight to rise the first time and about 5 hours to rise the second time so I was wondering if all my feeding was for naught, but today a great first try, albiet a bit too sour.
I am guessing that my lactobacillus outgrew my yeast and that I was left with a pretty tangy dough as a result?
Everyone seems to feed differently. I followed Gaarp’s directions and it went mostly as he said but doubled more slowly on day 3 and 4.
http://www.thefreshloaf.com/node/10251/starting-starter-sourdough-101-tutorial
I will try the 1:4: feeding schedule you recommend see if it takes the tang down just a bit.
I want sour, but not heartburn
Thank you very much for sharing this recipe and others, Susan! Your website is very inspiring! The bread came out just great
)
I have a question, please.
How to use the dough for pizza? Is there a limit of time it can wait in the refrigerator to be baked?
For my 1st Sourdough, this ain’t bad! « Sotsil on January 27 2010 at 11:31 am:
[...] my first recipe – Norwich Sourdough – introduced by Susan in her Wild Yeast blog (http://www.wildyeastblog.com/2007/07/08/my-new-favorite-sourdough/). She adapted it based on Jeff Hamelman’s Vermont sourdough. She has other recipes on [...]
I made my own starter a few weeks ago and have made 3-4 loaves since then. The loaf I made yesterday has been my best yet, but it’s definitely not as airy looking as the one in the photo above (it’s not the same recipe– I used the basic sourdough from the Breadbaker’s Apprentice). The texture and flavor are good, but I’m curious if there is an ‘ideal’ sourdough….what SHOULD it look like? Are all recipes different enough to result in different appearances?
P.S. I love your blog!
Great recipe. It may take the place of my no-knead sourdough bread.
Instead of a couche, I split a pvc pipe lengthwise, lined it with parchment paper and put the bread in for its second rising. Transfering the bread to the baking stone was a snap. The pvc is easy to store and really cheap.
Hello, I bought ‘Artisan Baking’ actually from your recommendation and made the started from there but I am a little confused as most of the recipes in there use only a little starter around 25g and this recipe uses 360g.
I think I have around 200g of starter, to grow this to a level needed for this (plus spare to make more starter) should i just feed the starter and not discard any on the next refreshment?
Thanks!
I found the recipe online one afternoon and decided to make the bread without really thinking much about how I was going to accomplish the steaming. Having no large spare terra cotta pots (as you suggested for a cheap way to capture steam) on hand, I used my turkey roasting pan (the dark kind with the lid) and inverted the bottom of it over both loaves on my baking stone. I also put a cake pan with water under the stone during the steaming phase. My bread is wonderfully golden brown and the crust is very crispy and a delight to eat!
Okay, I left my starter out of the frig and fed it for 4 days then baked this morning but my loaves still didn’t rise. The first time I used the starter (before it was stored in the frig) my loaves were great. I feed it every week but the last 2x I baked, my bread didn’t rise. Any suggestions? Thanks for the help. BP
Thank you so much for this brilliant recipe.
Both my mother, husband and I love this sourdough bread.
The only bread I have ever baked so far has been sourdough, and I only started this year. The recipe I had was not giving me the results I wanted. So I decided I needed an alternative. So I found your site and decided to try out you “New Fav”. Wow!!
I didn’t have time to let the dough rise for as long as I would have prefered, but it still came out beautiful. I shaped it slightly different. The crumb was fine but and soft, and the crust was ever so slightly chewy. Just Perfect. Thank you so, so much!! Btw. love you blog, will experiment with lots more!
Can I ask why you proof the loaves seam side up? Does it matter if I proof them seam side down on the same pan I will bake them on? (I don’t have a baking stone yet.)
Rachel, you can proof seam up or down. I like up, on a floured couche, because then the tops of the loaves (which are face-down while proofing) retain some of that flour on their surface, which lends an attractive rustic look. I would not recommend proofing free-standing on the pan, however; the sides benefit from some support, so that the loaves proof up and not out too much. If you don’t have a couche, you can use bowls or basket lined with linen or a dish towel: http://www.wildyeastblog.com/2009/01/08/my-non-bannetons/
When you proof in a basket, seam up is best because then the basket can simply be turned over to invert the loaf (seam side down) onto the pan or peel.
Sourdough Bread « Can you smell what the Pages are cooking? on April 4 2010 at 06:54 pm:
[...] is based on the Vermont Sourdough formula from Jeffrey Hamelman’s book, Bread, by way of this blog post on the Wild Yeast Blog. I’m pretty sure I forgot to add the salt after the autolyze period (something didn’t [...]
Thank you very much, Susan!
It will be my new favorite sourdough, too!
http://picasaweb.google.com/113754480375055625410/GHfbUI#5457421393669841090
Vera
hi Susan such a nice bread !!!
Susan !
First of all you are my bread baking heroine. Full stop.
Many thanks for your adaptation of Hamelman’s sourdough. Me too ! Thanks to you this is now my favorite sourdough, as well. I just made 4 loaves for the Easter weekend (plus 2 batches your Pain de Beaucaire) for all of my returning Easter bunnies and their kidlets. Even the littles loved the sourdough toasted with sweet butter and blueberry jam. The last loaf was made into ham sandwiches for the road.
I made one batch with my rye starter and the other with my whole wheat starter. Naturally the rye had a little more “bite”, but both were super good. One of these days I’ll get my son to help me upload a few snaps….right now I’m useless. Thanks again for your impeccable directions and your inspiration.
My first Sourdough « Tangential Thoughts on April 10 2010 at 10:47 pm:
[...] recipe i settled on was Norwich Sourdough. Why ? Firstly, it used a 100% hydration starter, which is what i had to hand. Secondly, it could [...]
Bellissimo questo tuo pane, l’ho fatto anche io ed e` buonissimo!
Se vuoi vederlo, lo trovi qui sul mio blog.
Grazie mille!
Pain au levain, Sourdough bread « Cooking by instinct on May 5 2010 at 12:27 pm:
[...] I used this recipe for this particular bread. Pain au levain close-up [...]
Hi
Just wanted to give you feedback on this recipe.
I was really pleased with the results, very good ’softer’ crumb then the previous sourdough I was making from Dan’s ‘Handmade Loaf’ book which was a lovely change. Nice crust too.
I didn’t follow your method for making the bread because I’m sort of stuck in the habit with the ‘no-knead’ bread method so I :
mixed the ingredients up last night until I had a well combined dough and left it in fridge.
took it out this morning left it to come to room temperature…then shaped it and left it to rest again on floured baking sheets ready to go into oven…and baked it…this is the method I find hassle free.
I did leave it to overprove which I often do with distractions from kids etc which meant it didn’t rise as much as I was expecting but it had no effect on the taste & texture of the loaf..
I want to try it again with just white flour for my middle daughter who doesn’t like the extra sourness from the rye flour..
and the other way I’m going to try is exactly the same ingredients but added raisins as I think the sourness of the rye and sweetness of fruit will set it off nicely…
so a big thank you for the recipe
Can I use Barely malted flour. I can’t find all purpose malted four anywhere.
Thanks
Angel, you should be able to obtain King Arthur All Purpose flour. It is malted. Malt is usually not mentioned anywhere on the label of most flours, but if you read the ingredients of most flours that are suitable for bread making, malt will be listed in the ingredients.
If you cannot locate any King Arthur, you should be able to find some Gold Medal Better for Bread. It is also widely available, and suitable for this recipe.
Thank you. I didn’t know that KA All-purpose is malted. I used KA bread flour and that seems to work as well.
Jeffrey Hamelman’s Vermont Sourdough | Zeb Bakes on June 9 2010 at 01:57 am:
[...] your fingers in the flour for the first time, try Susan on the WildYeastBlog.com site – her Norwich Sourdough is derived from the Vermont sourdough. Possibly related posts: (automatically generated)Bread – [...]
This website is totally amazing.
I’ve cultivated my very first ever sour dough starter and it’s bubbling nicely.
Really looking forward to trying this as it looks great!
Much love from Oxford, England.
What would happen if you were to retard these for, say, 20 hours in the fridge?
My dough is just sticking to the hook and going for a ride. is this normal or what can I do to fix this?
hi! I just love this recipe! However, I am not able to achieve a nice crust, as it’s always too soft, and is crusty once out of oven, and perhaps an hour more. After that, it’s just soft. May I have some advice? thanks in advance!
Love the crumb!
p.s writing from Malaysia where humidity levels are really high!
Very nice! Creates! Welcome: Terike
I’m a bit confused. I’m new to bread making, and in all your recipes that call for a starter, you never specify what kind of flour the starter should be made of.
Is that because it’s assumed that all starters are white flour starters?
For Starters « The Artful Gardener on September 29 2010 at 07:42 am:
[...] was inspired by this post on the blog food for my family and I found a decent bread recipe here on the blog Wild Yeast. You can also find tips for maintaining a sourdough starter here. It is a [...]
#262: Norwich Sourdough Bread | Foods I like on October 3 2010 at 08:26 pm:
[...] think I saw the recipe for Norwich Sourdough Bread a while ago, but I turned away from it because all measurements were not only by weight, but were [...]
Sue,
I made this recently and gave a loaf to a friend. Well the yesterday evening they stopped by and we shared a bottle of wine together while the children were out playing.
The wife said “oh by the way” and then told me how wonderful that loaf of sourdough was. She had grabbed a store bought the same day. And in side by side taste tests the Norwich Sourdough was much better. In fact her kids requested the Norwich not knowing that it was homemade.
An amazing recipe thanks for sharing it.
Tom
Hi Susan,
I live in Bogota, Colombia, at 2800 meters above sea level, and i had my doubts about the recipe… Well, it turned out awesome; maybe a little denser than your pics, but that can be due to the lower percentage of O2 in the Air, causing the bacteria to work slower. Also, there are VERy few flours to be bought here, and in wheat only all-purpose and baker’s flour. Rye is OK to be found. The importance of using fresh baker’s flour is crucial to a good bread; if I use all-purpose, it’ll become a brick. Your blog is just super! Congrats!
Hello Susan,
First I read your answers over the years. I’m an apprentice in baking bread. But, with your good recipes and tips I’m amble to bake nice bread. Still I have a question; how do you get such a beautiful grayish color on the Norwich sourdough?
Connie, the crumb color comes from 1) using unbleached flour, 2) using coarsely ground whole rye flour, and 3) avoiding overmixing, which breaks down pigments (and these also contribute flavor, so you really don’t want to break them down!).
The Fruit of Baz’ Loins! « Yummers! on December 24 2010 at 08:04 pm:
[...] Adapted from Wild Yeast [...]
?????????? ???? ?? ???????? – Norwich Sourdough | ? ???? ?? ????? on January 7 2011 at 11:55 am:
[...] and Recipes», ??????? ???????? ?????????? ????? ????? wildyeastblog, ????????? ?????? 125% ????? 100%-?? [...]
Hey Susan,
I stumbled across your site while looking for a recipe for my white elephant bread- crispy crust and big holes in the crumb.
I’ve made two attempts of your recipe over the weekend and the one that just came out of the oven is my holy grail- thanks so much!! this site is amazing (:
Have a great week!
Neta.
Hello, just stumbled upon your fab website and thought you may like to know a sourdough starter trick I learned in Spain many years ago which was to put two or three UNWASHED grapes into the starter at the beginning and remove next day and the yeast on them would be enough to get it all going quickly.
Great bread! After several times doing it I found that the ftemperature during fermentation and the fact that the is ripe have a major affect on the results. At low temperuture I either extend the time or using the lamp of my stove to get higher temperature.
Have Your Sourdough and Eat It on January 31 2011 at 12:14 pm:
[...] a wonderful time consuming project to make at home, it is becoming a lot easier to find excellent quality sourdough at bakeries and [...]
Sourdough Starter | foodscratch on February 6 2011 at 01:42 am:
[...] the house this weekend and as a result we have yummy sourdough bread. This weekend Larry and I made Norwich Sourdough, as posted on Wild Yeast, but put it in a loaf tin instead of forming [...]
My First Sourdough « my own little dust-pile on February 24 2011 at 08:48 pm:
[...] reading about how much people loved this recipe, I decided to go with the Norwich Sourdough from Wild Yeast. Now, keep in mind that although I’ve been feeding it with white flour for [...]
BBD#37 – Pão com sourdough – passo-a-passo/Norwich Sourdough | Anasbageri on February 28 2011 at 02:37 am:
[...] ser facilemte congelado. O meu está no congelador já em fatias. A receita é da Susan do blogue Wild Yeast adaptado de Bread: A Baker’s Book of Techniques and Recipes – Jeffrey Hamelman) Eu [...]
Sourdough thin-crust pizza | foodscratch on March 2 2011 at 12:34 am:
[...] and turning some of the bread dough into pizza is fast becoming a ritual. Last Sunday I made Norwich Sourdough and reserved a little dough in the fridge for pizza later that night. I kneed a little more flour [...]
Sunday brunch | foodscratch on March 5 2011 at 06:38 pm:
[...] Sourdough Loaf is the Norwich Sourdough posted by Wild Yeast. [...]
Hi Susan,
I have a standard simple oven. How can I create steam in it for this bread. I wish to make it but don’t know how to give it the steam you’ve mentioned. Would be ever greatful for your help! Many thanks!!
Minnie – here’s my post about how I steam my oven: http://www.wildyeastblog.com/2007/07/02/steam/
I read Jeffrey Hamelman’s book last year, and remember trying out the proportions of this recipe. I think my starter (I grew it in September) wasn’t at full strength, and I had a lot of trouble. I’m trying your version today, and hopeful that I have good luck. I don’t know if it’s the weather lately, but my breads haven’t been as good as I’ve wanted, and as they have been in the past. Who better to turn to than you to get me back on track?! Thank you for your wealth of information!
Blue cheese and walnut sourdough, and the inspirational Peter Reinhart | foodscratch on March 19 2011 at 10:21 pm:
[...] is not particularly sour. It seems a very good sandwich and toast bread, but is not a sour as the Norwich or Norwich-more that I have been baking for the last month or so. The milder flavor, however, seems [...]
Thank you so much for post this recipe. Like many others I had such a success with this recipe. I went through 10 pounds of flour and 5 batches of bread before I found your recipe. This batch came out perfect. In fact it’s the best bread to come out of my oven yet. Thank you, thank you, thank you! You can check out the batch of bread here: http://littlehomesteadinthedesert.blogspot.com/2011/03/sourdough-success.html at my blog.
Hi Susan,
I’ve done this bread many times. I get great results almost every time. But I must say that everytime the taste is different. Few weeks ago I did this recepie again and got a taste that I cannot replicate…
I truly believe that the two main factors are Time and Temperature. I am interesting to understand whether you and the others are having the same experience…
Thanks.
I really enjoy this site and find it very helpful. I was wondering why you couldn’t do the bulk rise overnight in the refrigerator after the second turn, take it out in the morning, let it come to room temp for about an hour, then proceed with the initial shaping, bench rest,etc, rather than holding the shaped loaves in baskets overnight in the fridg? I find that when I do this I have trouble with the linen towel sticking to the loaf, then deflating it when I try to remove it no matter how well the baskets are floured.
Painea cu gust de acasa | Apa. Faina. Sare. on June 3 2011 at 04:56 am:
[...] gustat, aceasta e cea la care ma intorc mereu. Prima data am vazut-o pe Wild Yeast. Se numeste Norwich Sourdough si este preluata din cartea lui Hamelman, (unde se afla cu numele Vermont Sourdough) si este [...]
Hi Susan,
I’ve been using your sourdough recipe for months, and I absolutely love it! Have you had any success with adding any dried fruit or nuts to the dough? I’ve tried a couple of times, but I can’t seem to get the loaves to rise much during proofing or baking. Should the dough be kneaded longer to develop more gluten (to support the add-ins)?
Hi I came accros your recipe on tfl. I couldn,t wait to try it. I,m still pretty new to bread baking especially sourdough. I just put up the dough this morning. I thought i had it all scheduled out right but of course things came up. The dough ended up rising for five hours at room temp before i could get home to quickly get it in the fridge to at least retard. I hope that won,t mess it up. I,m going to go shape now and bake tomorrow morning. I’ll let you know how it comes out!
Sourdough Bread | Bread Wise on July 29 2011 at 06:26 am:
[...] quite glad I decided to experiment a bit. This Wild Yeast recipe is absolutely going to become a regular. The recipe calls for a little bit of rye flour, and [...]
I’ve been making your Norwich sourdough bread for over a year now. It’s my standard recipe for the household making it twice a week. To change things up, I substitute wheat or white flour instead of the rye. It always comes out great. Last week I substituted Bob’s Read Mill No. 1 Duram Wheat Semolina Flour. This substitute gives the closest to a traditional San Francisco sourdough that I’ve been able to achieve. It’s chewier and gives a slight nutty taste.
Enjoy,
Roman
Los Altos Hills CA
Baking Sourdough Bread At Home: A Beginner’s Guide | The Boomtown Rap on August 1 2011 at 04:10 am:
[...] Here’s a good one to start with; it’s an easy dough to work with and the bread is one of my favourites: Norwich Sourdough Bread [...]
Percy. « the gnome thief on August 7 2011 at 04:04 am:
[...] was a scaled down version of the Norwich Sourdough from the bread-blog Wild Yeast. It was made only a few days later but showed a world of [...]
This was my first attempt at a true sourdough bread, and it came out wonderful. Thanks to your insight, from well explained recipes to the shaping videos, I tamed the wild yeast.
What a service you provide to the world with your knowledge. I’m forever indebted to you.
How to Make a Sourdough Starter: Day Six — Pinch My Salt on September 28 2011 at 03:20 pm:
[...] bread was by far the best sourdough I’ve ever made. It is called Norwich Sourdough and the recipe/formula can be found at Wild Yeast. Although the formula for this particular bread [...]
I did it. Thanks
Hi
I’ve been making this on sourdough on a regular basis and the results have been mostly fabulous.
On the odd occasion I get really sticky dough and the results are a little disappointing. The first thing I can think of is that I haven’t mixed the dough long enough and the second thought is sometimes when it’s really warm and humid the dough proves really quickly and it almost too sticky to shape. I’m wondering if I should fold one more time when it’s like this? Any thoughts? Best DF
just made this today – amazing!!! I love that it doesn’t require hours upon hours and days upon days to make. Granted, it’s not a very sour flavor this way, but for a “quick” 100% sourdough it’s great! Next time I do want to try retarding in the fridge overnight to develop the flavor more. Thanks for posting this great bread recipe!
Making Sourdough Muffins with Youngest | The Ubiquitous Chickpea on October 7 2011 at 03:13 am:
[...] hard to find ways she can safely help me in our kitchen. But the other morning after setting some Norwich Sourdough going I had some left over sourdough starter so decided to make some muffins – only with [...]
I tried this one over weekend. And this one is a keeper!! Amazing flavor!! The bread has very mild creamy sour taste, which is how I prefer any sourdough bread.
Thanks, Susan!
I am aspiring to make my own starter and bake this bread. Day four pm my levain had risen 2 inches. Day 5 am no change, maybe a scant few bubbles? I fed and have placed back in the warm space but when should I give up on it, scrap and start again? Thanks, Clare
sourdough recipe ii « fried sig on November 17 2011 at 12:36 pm:
[...] i return, i vow to start a new sourdough starter. and i think i’ll try this recipe. just look at those [...]
I made this on the weekend, I found the loaves proved beautifully however the consistency of the dough was quite loose, therefore I didn’t get a huge amount of rise when baking ( I don’t use bannetons). After baking, the bread just crisps up beautifully and the taste is amazing. I had beautiful holes throughout the bread! This recipe is a winner, I just need to practice more! If anyone has ideas or suggestions, it would be appreciated
I finally was able to get back on track with my poor, 2-month neglected sourdough starter and made your norwich sourdough. I was so happy with the results and that I was able to still shape a batard after not baking anything for a few months.
I don’t have that much experience with bread baking as it is, but this has given me the confidence to try my hand at a lot more!
Here’s a link to my flickr page so you can see the results: http://www.flickr.com/photos/madisonbaker26/
Tonight, I’m making another batch but I’m going to increase the hydration by 5% and see what happens. Cheers!
Hi,
Everyone is lovin the Norwitch….Thanks!
Its my first edible sourdough leaf!
I would like the dough to rise a bit more during proofing.
The crumb is a bit dense…
Any thoughts?
Mimi, for a less slack dough, you may need to add less water, or develop the gluten more by mixing it longer. Also, if the loaves failed to spring much in the oven, the loaves may have been overproofed.
T, lovely loaves!
David, dense crumb can mean you need more water in the dough, less or more mixing, and/or longer or shorter proofing. I.e., it could be just about anything! I’m planning to write a post about dense crumb soon.
Thanks Susan. I just baked another two loaves, one sprang up amazingly in the oven, the other when I slashed it ( still practicing the technique) didn’t rise as much but still beautiful. I may try the less water & see what happens. Don’t think I am over proving as after the rest/retard they go to the fridge overnight & baked in the hot oven the next day. Will try less water & see what happens!
Hi there. I think my starter is ready to go and I am anxious to bake some sourdough, however, I have neither a couche nor a banneton nor any other type of shaping device other than a solitary crappy old nonstick loaf pan. I do have an enameled cast iron dutch oven. Can I proof and bake it in that? Or is there another trick?
Masha, you can proof your loaves in just about anything: http://www.wildyeastblog.com/2009/01/08/my-non-bannetons/
For baking, a preheated cast iron dutch oven can be used in lieu of a baking stone.
I made this bread today and it turned out wonderfully. I got loaves with a thick, crunchy, golden crust and moist, slightly sour interior. I think this is one of the best breads I’ve ever baked! Thanks for sharing!
Susan, your blog is a joy! I spent yesterday baking Finnish Rye, 47% Rye, Miche with Wholewheat starter and am finishing off two Norwich loaves. After a little practice, and taking my courage in both hands with the Finnish Rye (to paraphrase, “it’s dough, but not as we know it”), I am confident to recommend your site to anyone new to sourdough baking. Particularly the Norwich- what a little star! My humble thanks.
Hi Susan,
When you say mix for 3-4 minutes, do you mean in a KitchenAid-style mixer or a commercial one?
Thanks
Bob
Bob, this is in a home countertop mixer. However, you should judge sufficient mixing by gluten development, not by the clock!
Baking Sourdough Bread « Tea & Cookies | Bread Recipes Tips on February 2 2012 at 09:58 pm:
[...] final recipe, for the crusty sourdough loaf below, comes from the website Wild Yeast and is considered an advanced recipe. It’s written for [...]